- Rocket firmware
- Hauppauge Capture
- Manuals
- Connection Diagrams
- PC Recording
- PS4 setup
- YouTube Live streaming
- Facebook Live streaming
- Troubleshooting
- FAQ
- Videos
Upgrade your HD PVR Rocket to the latest features with a firmware update
Are you using Component, composite or S-Video with the Rocket?
If so, we recommend firmware version 43. If you are using HDMI, we recommend firmware version .48Features and improvements: Rocket version 48
- The microphone audio volume has been increased by 50%, fixing some problems with low microphone audio volume when recording standalone
- Adds support for recording stand alone from video sources without audio (such as medical devices)
- Adds support for HDMI video and LineIn audio (for use with the Hauppauge Chat Cable). You need to use Hauppauge Capture to set the input combination to HDMI video and LineIN audio. This setting will then be remembered in standalone mode.
- There are no file size limits for recordings with NTFS formatted USB thumb drives. For example, if you insert a 16GB NTFS formatted USB thumb drive, you can record about 8 hours of video in one file
- Rocket recordings are now compatible with the VLC media player
- Audio processing improvements (your recordings will sound better)
- Fixes flashing on some TV sets
- This version now supports HDCP management. HDCP detection is disabled by default (this will ensure Xbox One game play can be recorded)
To turn HDCP detect ON, PUSH and HOLD the record button for 5 seconds. The red record ring will flash twice.
To turn HDCP detect back OFF, PUSH and HOLD the record button for 5 seconds and the red record ring will flash once.
Note: in either mode, you still cannot record HDMI video protected with HDCP.
Firmware upgrade notes:
After upgrade, the Rocket needs to be power cycled to complete firmware upgrade: the Rocket USB cable must be unplugged and replugged.
Upgrade your Rocket from your PC
File name: hdpvrrocketfirmware_3_1_1_35_48.exe
Installation instructions:
Note: Make sure you have installed Hauppauge Capture before updating the firmware. And plug in BOTH the red and black USB connections to assure adequate power during the firmware update.
- Click the Download button above (this is the Rocket Windows driver and latest Rocket firmware). Save to your PC (do not click Run).
- Connect your Rocket to your PC using the BLACK and RED USB cables.
- Run the downloaded file.
- Click Install and the firmware upgrade will begin. Your Rocket will blink for a few seconds and then the firmware update will be complete
- Click Finish
You can now either disconnect your Rocket and use it in the standalone mode, or you can continue to leave it connected to your PC and use Rocket with Hauppauge Capture.
Upgrade the Rocket firmware from a USB thumb drive
File name: hdpvrrocket_3.1.1.35.48.zip
Installation instructions:
- Turn the Rocket off by disconnecting the USB Power Cable
- Download this file and unzip it to root directory of a USB thumb drive. There is one file: jedi.img
- Plug the USB thumb drive into the HD PVR Rocket
- Reconnect either the BLACK USB cable to USB power supply or both the BLACK and RED USB cables to two USB ports on a PC
- The RED Record Ring will flash. This means the Rocket firmware upgrade is in progress.
- Please wait until the RED Record Ring stops blinking (about 30 seconds). Then unplug/replug the USB Power Cable to complete the process
- Note: the jedi.img file is deleted from your USB thumb drive after the firmware upgrade
Are you using Component, composite or S-Video with the Rocket? If so, we recommend firmware version 43.
With analog video sources (Component, composite and S-Video), we recommend firmware version 43.
File name: hdpvrrocketfirmware_3_1_1_35_43.exe
Installation instructions:
Note: Make sure you have installed Hauppauge Capture before updating the firmware. And if you are powering the Rocket from a PC, plug in BOTH the red and black USB connections to assure adequate power during the firmware update.
- Click the Download button above (this is the Rocket Windows driver and latest Rocket firmware). Save to your PC (do not click Run).
- Connect your Rocket to your PC using the RED and BLACK USB connectors
- Run the downloaded file
- Click Install and the firmware upgrade will begin. Your Rocket will blink for a few seconds and then the firmware update will be complete
- Click Finish
You can now either disconnect your Rocket and use it in the standalone mode, or you can continue to leave it connected to your PC and use Rocket with Hauppauge Capture. When you run Hauppauge Capture, you can make settings such as audio and video sources, bit rate and volume adjustments 'sticky' for use standalone.
The Hauppauge Capture application: Record, trim and upload your game play
Hauppauge Capture:
- Record and stream your game play with in-game chat with our microphone mixing feature
- Simple and fast trim editor
- Built-in YouTube upload
- StreamEez for easy streaming with Twitch and YouTube
- Simple to use video quality selector
Hauppauge Capture
Hauppauge Capture version 43356
Date: Dec. 21, 2025 | Size: 86 MB
Release notes |
Backup download site |
Previous version 38344
To install:
- Plug the Hauppauge recorder into your PC
- Click the download button and save Hauppauge Capture to your PC (do not select 'Run')
- Once Hauppauge Capture is downloaded, run the Hauppauge Capture installation
- If you see the message "Windows Protected Your PC, Windows Smartscreen prevented an unrecognized app ...", click 'More info' and 'Run anyway'. Windows Smartscreen is a new 'feature' in Windows 10 to prevent new updates from being installed automatically.
- After installation, you will be asked to reboot your PC. Please reboot.
- While rebooting your PC, if you have an HD PVR 2 or HD PVR Pro 60, remove the USB or power plug from the back of the device for a few seconds and then plug it back in. This resets the devices.
- Once your PC is rebooted, you will see the Hauppauge Capture icon on your Windows desktop. Run it. No other setup is needed.
Hauppauge Capture supports the following products:
- WinTV-HVR-9xx (S-Video and composite video)
- HD PVR Pro 60
- HD PVR 2 (all models)
- Colossus 2 and Colossus
- HD PVR Rocket
- HD PVR 60
- HD PVR model 1212
- USB-Live2
- ImpactVCB-e and ImpactVCB
- WinTV-HVR-1265 (analog video and audio)
HD PVR Rocket Manuals
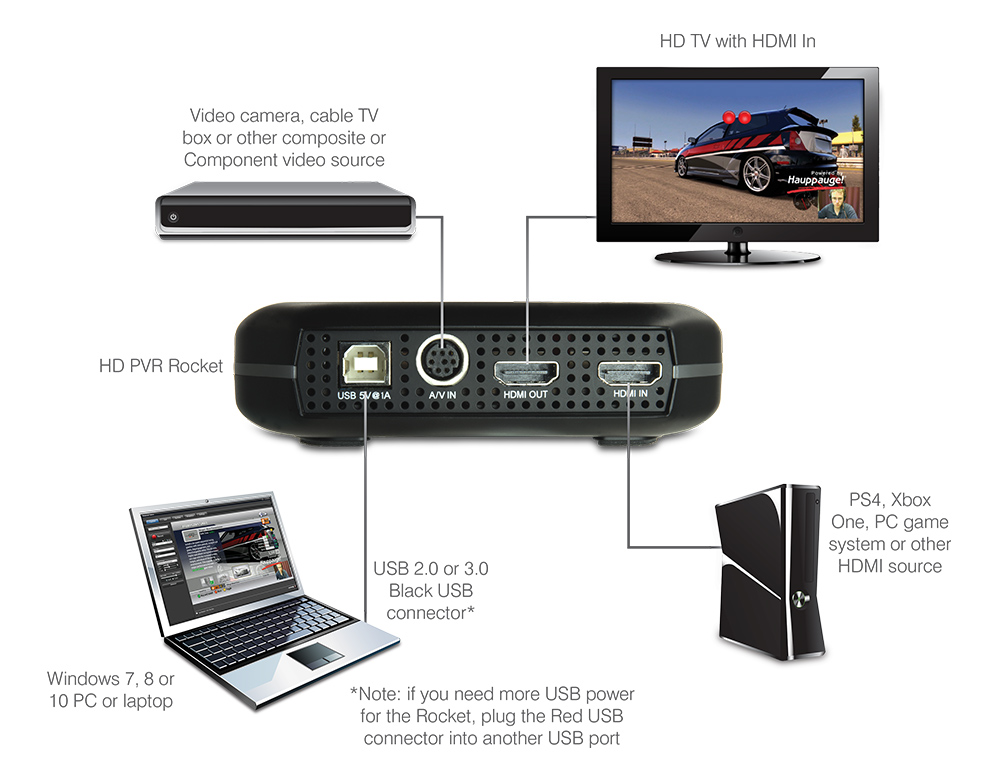
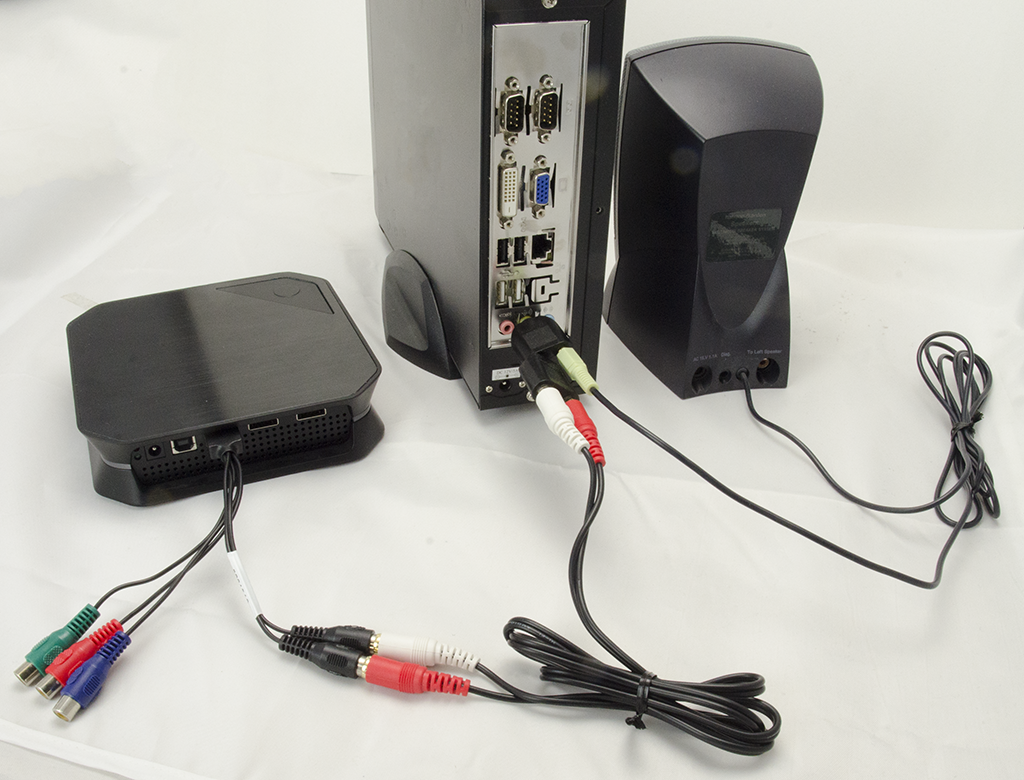
HD PVR Rocket Connection Diagrams
HD PVR Rocket PC connection
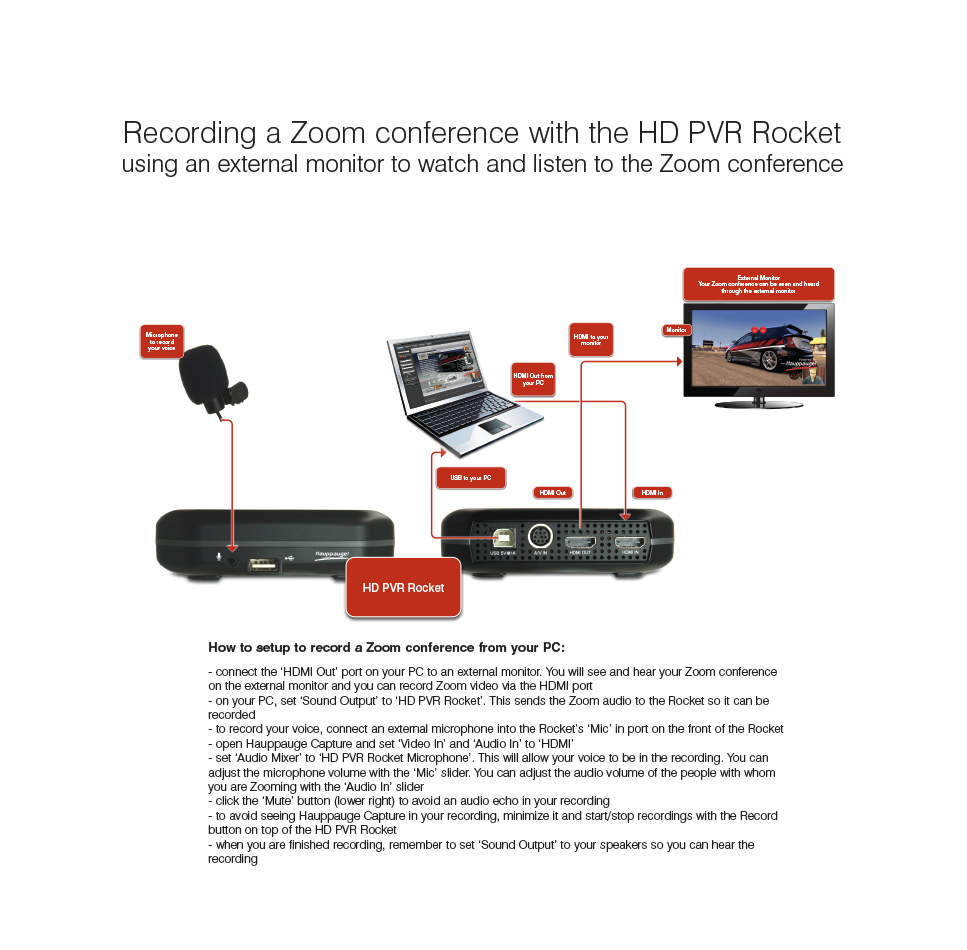
Recording a Zoom conference with the Rocket
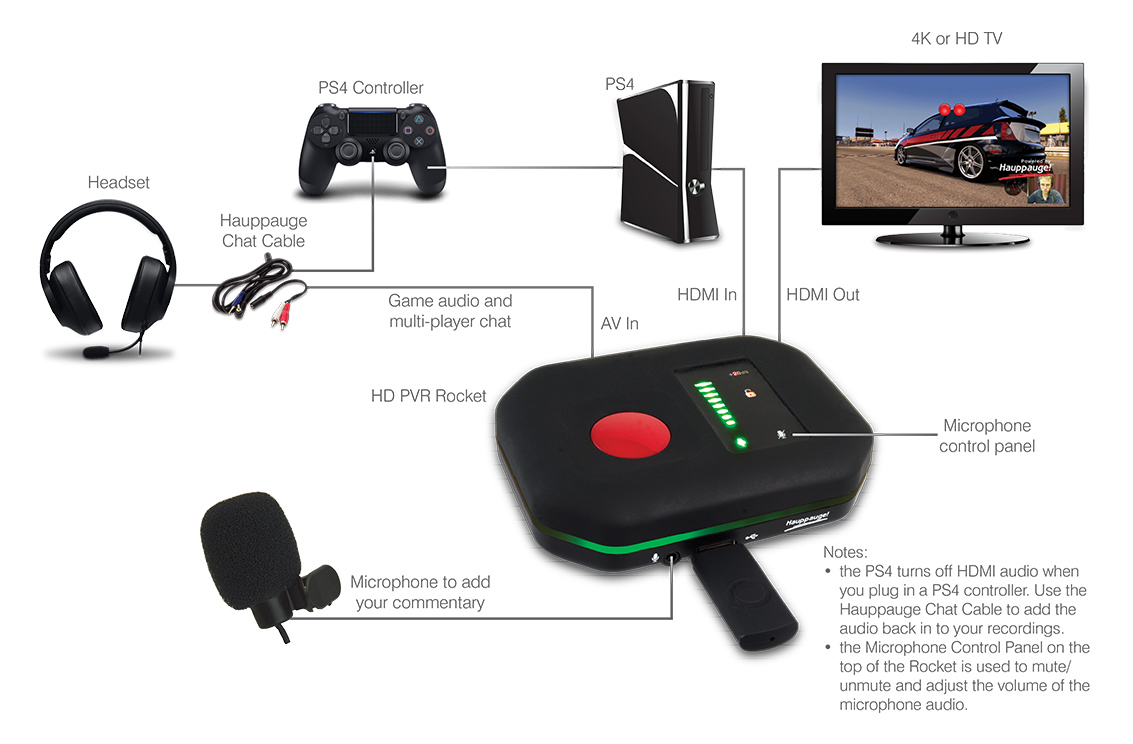
HD PVR Rocket PS4 connection
HDMI to Component video converter
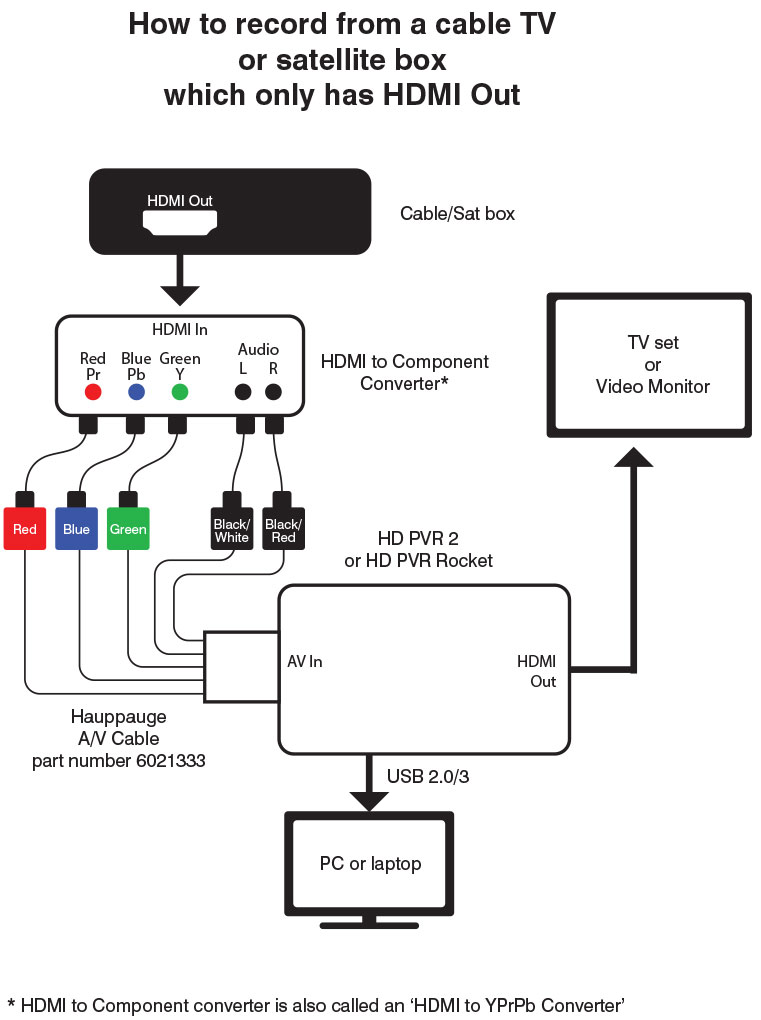
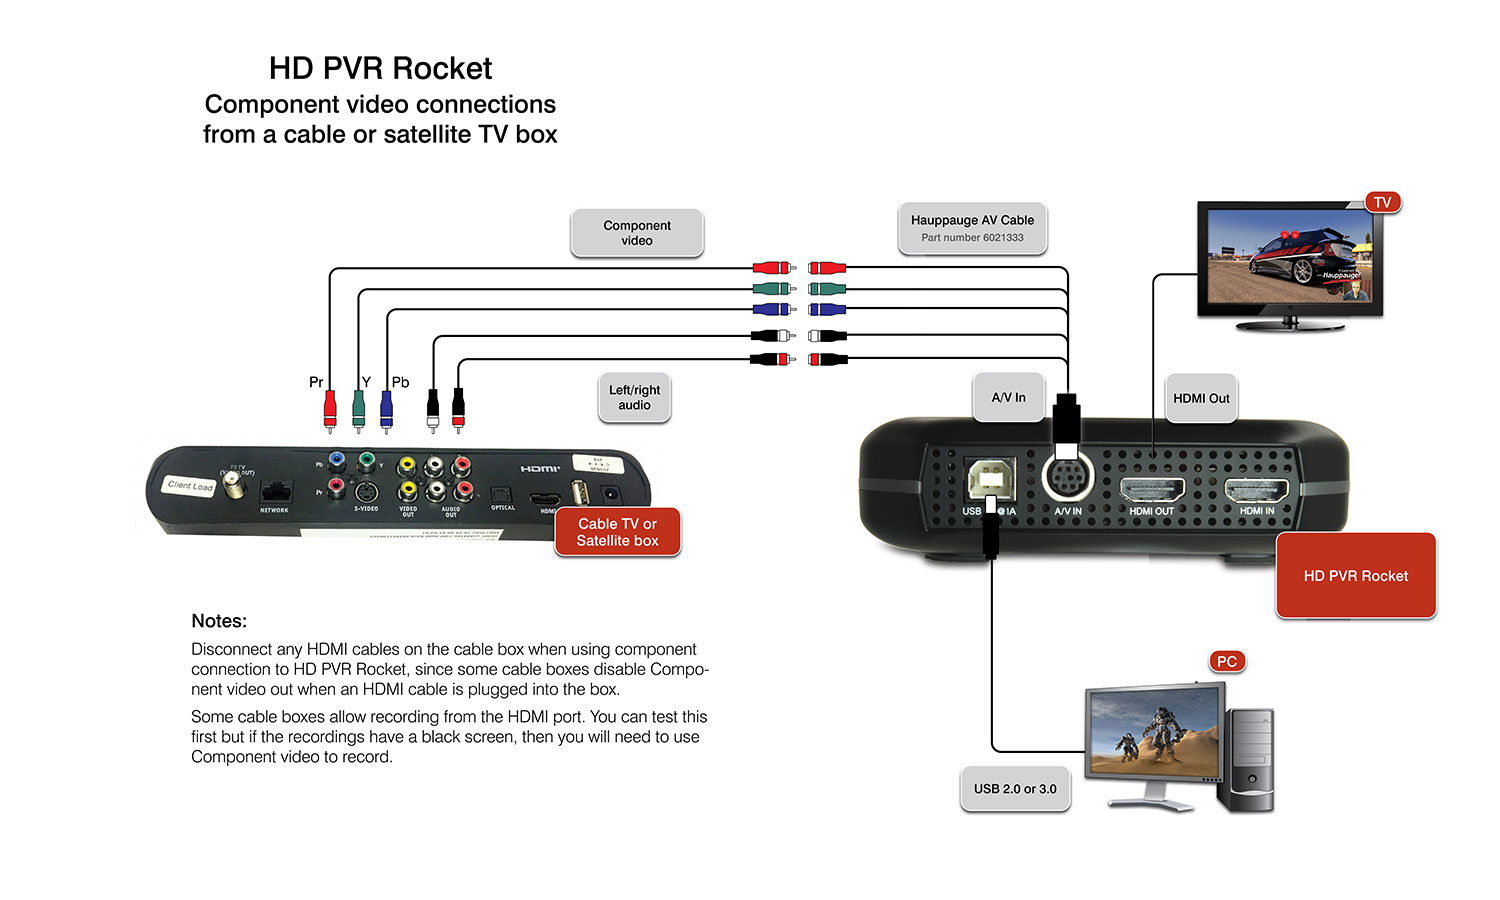
Component video connection
for cable and satellite TV boxes
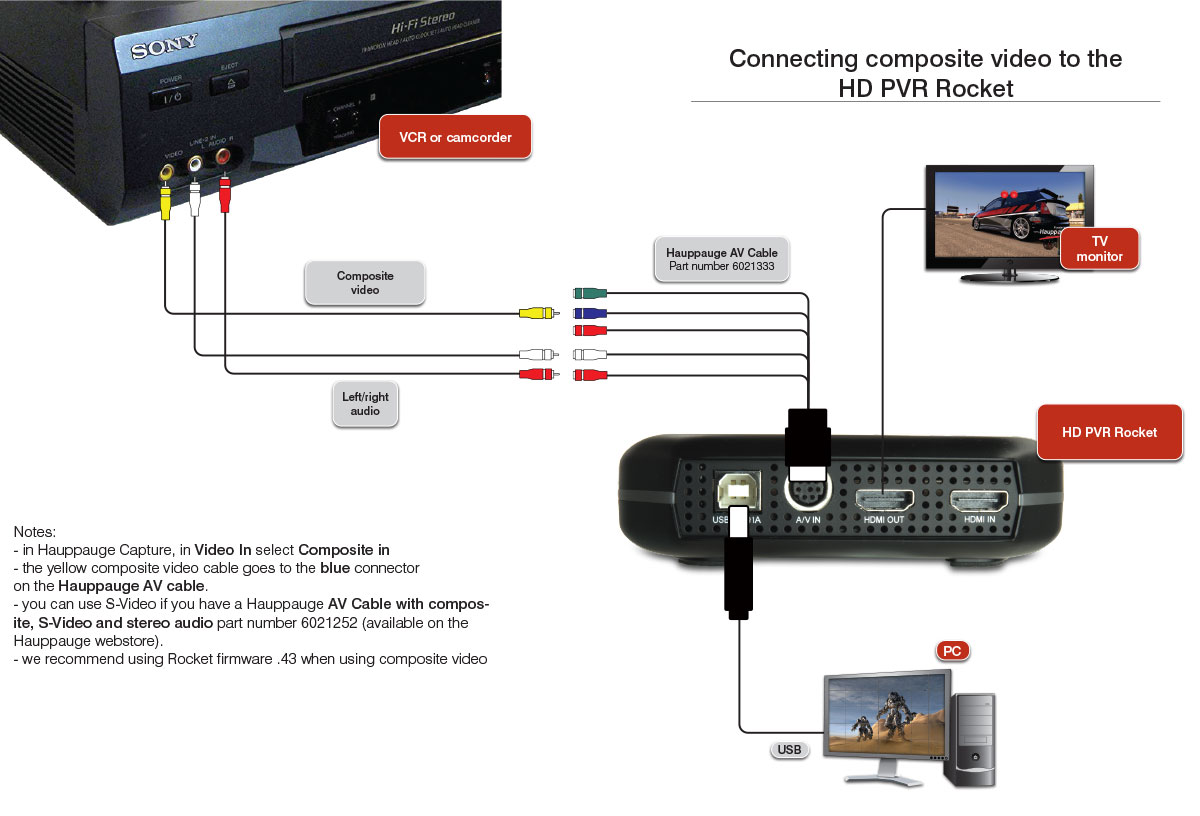
Composite video connection
for VCR and video cameras
Record your PC screen
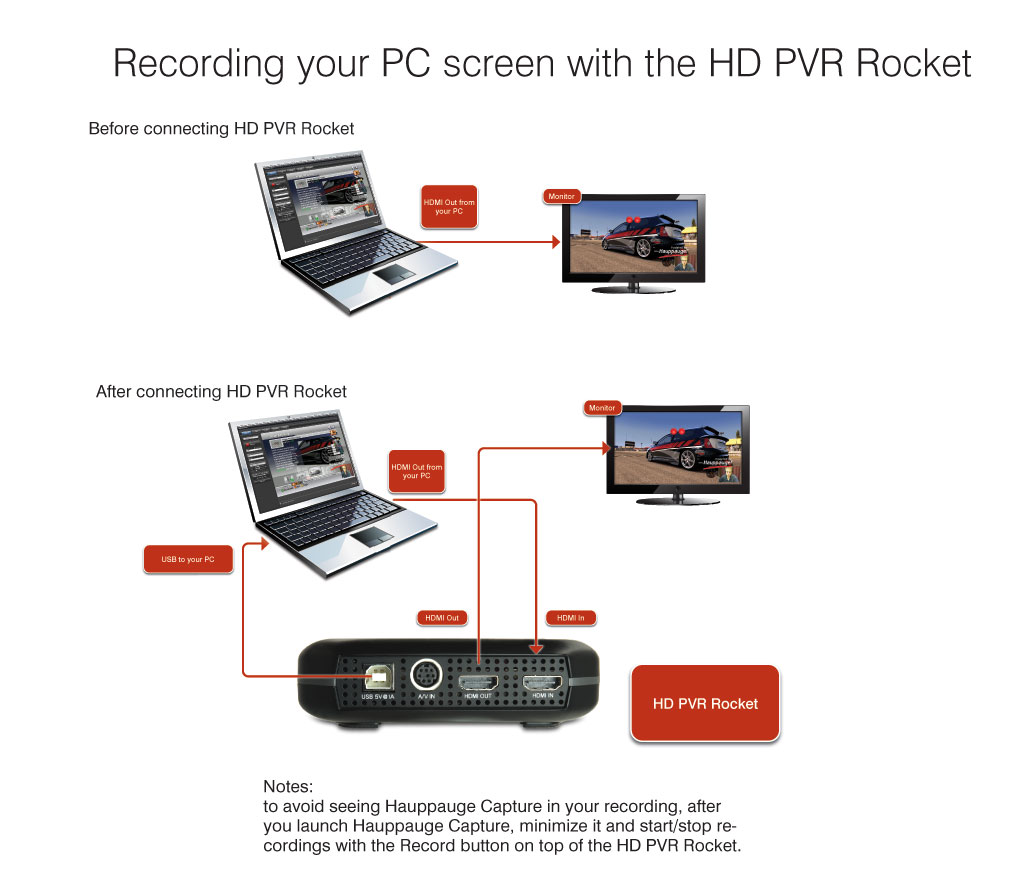
Recording your PC screen with the Rocket
Note: If you are using Rocket stand alone to record your PC screen onto a USB thumb drive, please skip to step 2.
Record from HDMI, PC connected mode
(click to play video)
Step 1 (Optional) - Connect the HD PVR Rocket to your PC and install Hauppauge Capture
If you are using the Rocket to record your Gaming PC on a PC (the Gaming PC or another PC), then install Hauppauge Capture now on the PC where you will recording to. Please see these instructions.
Here is a video which shows the connections (it uses the HD PVR 2 but the same HDMI connections are made when using the HD PVR Rocket).
Note: HD PVR's can accept video from a PC in the following formats ONLY:
- 1920 x 1080 at 60Hz max (1080p60)
- 1280 x 720 at 60 Hz max (720p)
- 720 x 480 at 60 Hz max (480p)
If you are running in any other video mode, you will see either a black screen or distorted video. Check your video mode!
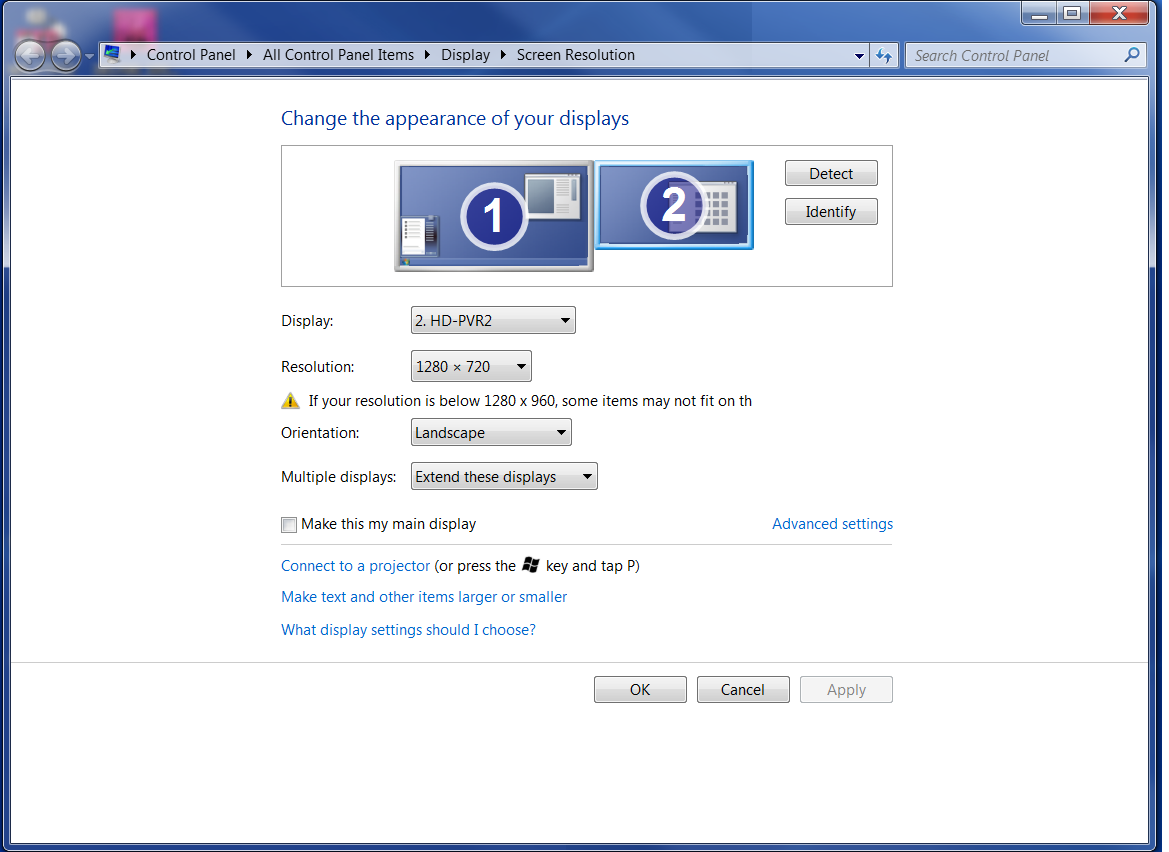
Step 2 - Configure your Gaming PC's video mode
On the computer where you will be playing your video games (we'll call this the Gaming PC), connect an HDMI cable from your graphics card HDMI port to the HDMI in on the HD PVR.
Note: your Gaming PC screen may go black for several seconds and then you will be back at the Windows desktop.
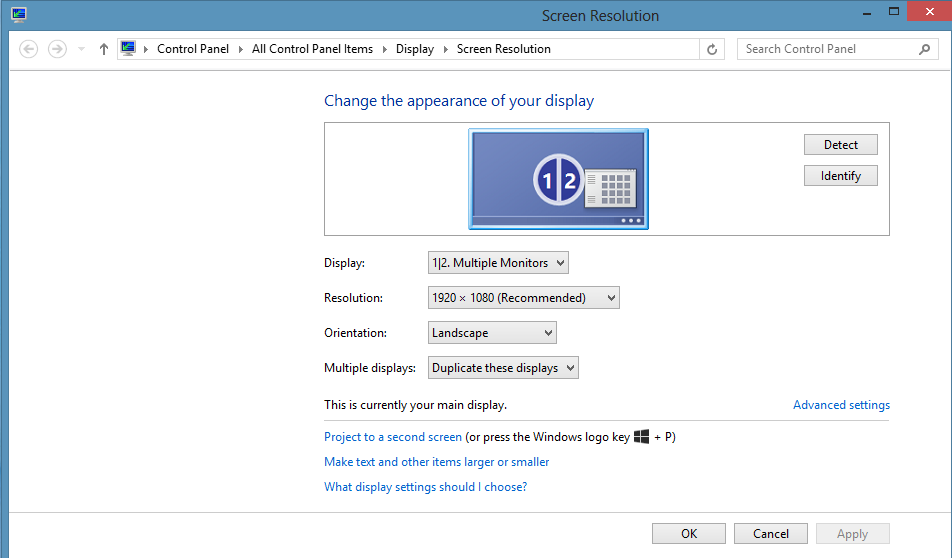
Under Display you should see your HD PVR model in the drop down menu. Example: HD PVR 2.
Select your HD PVR recorder (click for screen shot).
Under Resolution, set to either 1920X1080 or 1280X720.
Under Multiple displays, set to Duplicate these displays.
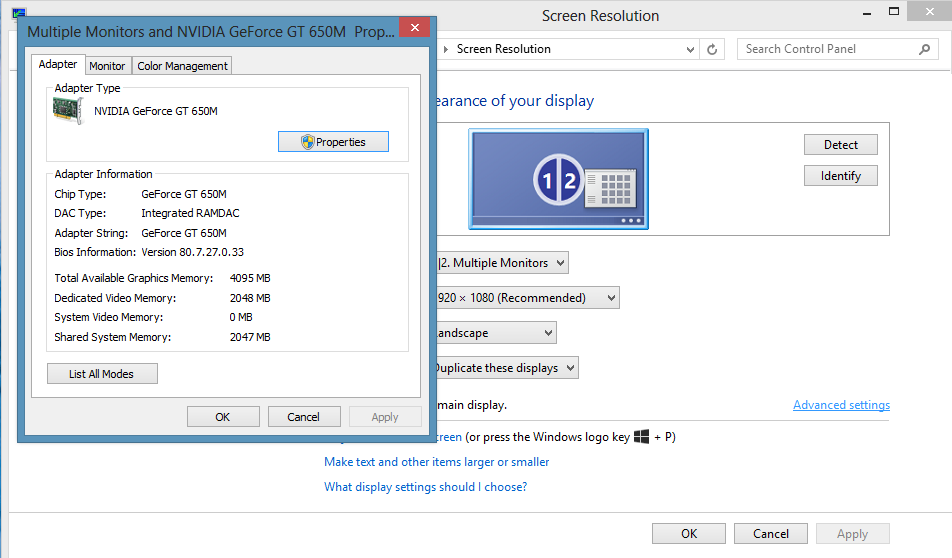
Click Advanced settings (click for screen shot). Set Refresh Rate to 60p Hz Set Scaling to Maintain Display Scaling.
Step 3 - Connect the HDMI cable from your Gaming PC to the HD PVR's HDMI In connector
If you have a gaming laptop, simply plug an HDMI cable from your laptops' HDMI out port into the HDMI In on the HD PVR. You should see your PC screen on the video monitor. If you do not, click the Windows button on your keyboard and at the same time the P key. Then select Duplicate. If you have set your PC's video mode correctly (step 2 above), you should see your PC screen on the video monitor.
If you have a desktop PC, then remove the HDMI cable which is plugged into the monitor and plug it into the HDMI In port on the HD PVR. Then take an HDMI cable and plug one end into the HDMI Out port on the HD PVR and the other end into an HDMI port on your monitor. If you have set your PC's video mode correctly (step 2 above), and you have selected the correct HDMI source on your TV set, you should see your PC screen on the video monitor.
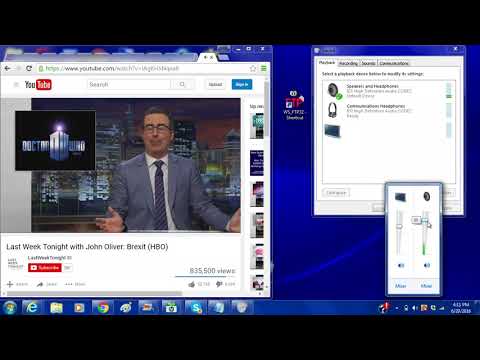
Step 4 - Configure the audio on your Gaming PC if sound comes through your HDMI cable

Step 4 - Configure the audio on your Gaming
PC if sound comes through your HDMI monitor
(click to play video)
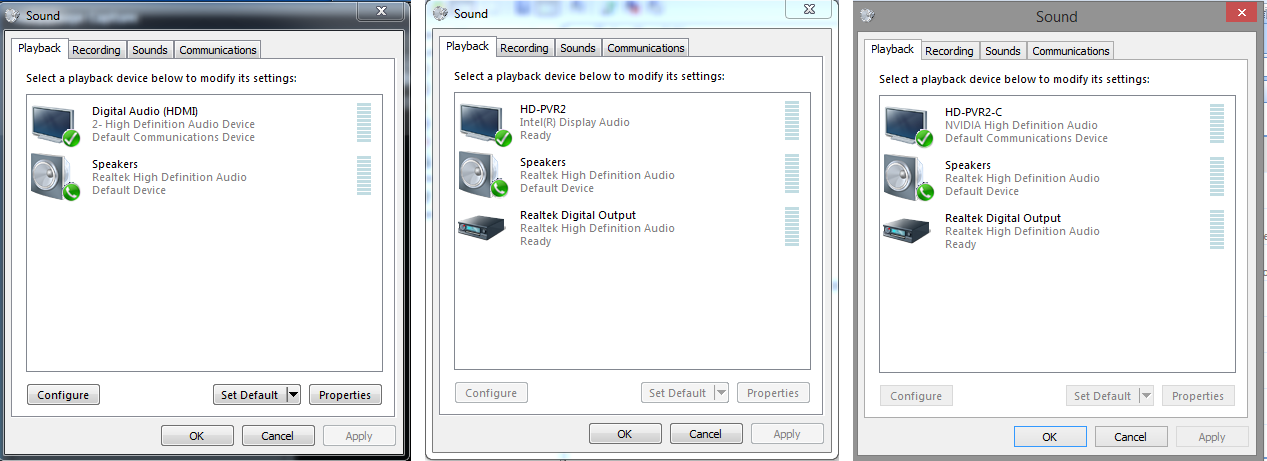
If you are using the HDMI pass through on the HD PVR (if you are not using HDMI pass-through skip to step 4a), on your Gaming PC right click on the Speaker icon on the taskbar and select Playback device.
In Playback devices find your HDMI connection to the HD PVR (it should say HD-PVR2, HD PVR Rocket or sometimes Digital audio (HDMI)). Right click and select Set as default device.
Step 4a - Configuring audio if you are using speakers connected directly to your Gaming PC
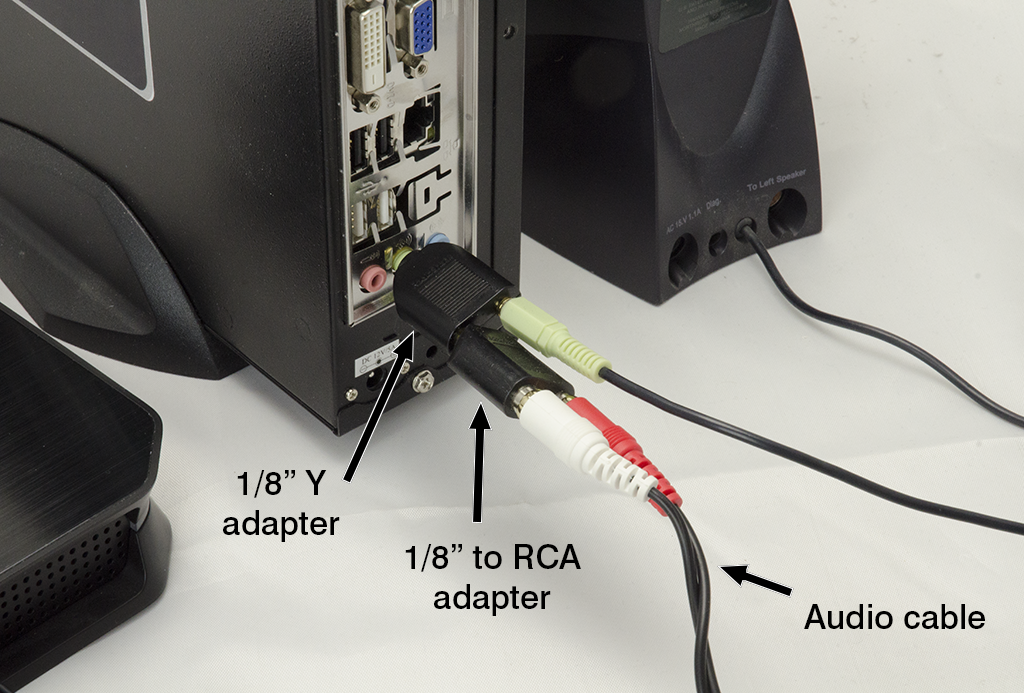
If you are listening to sound from your Gaming PC through speakers and not on your video monitor, to hear audio without any audio delay you will need to split the audio coming from your Gaming PC. To do this, you will need two adapters: an 1/8th inch stereo Y adapter, a 1/8th inch stereo to RCA male adapter.and an Audio cable set. These adapters are common and can be purchased from Radio Shack or online.

Step 4a - Adapters needed to split the
audio from your gaming PC
(click to enlarge)
- Connect the 1/8" stereo 'Y' adapter to the green audio port (the audio out port) on your Gaming PC.
- Plug your speaker cable into one end of the 1/8" stereo 'Y' adapter.
- On the other end of the 1/8" stereo 'Y' adapter connect the 1/8th inch stereo to RCA male adapter
- Plug in the Audio cable set into the RCA plugs on the 1/8" stereo to male adapter (click to see a picture of the audio splitter installed)
- Then plug the other end of the Audio cable set into the back of the HD PVR via the Hauppauge AV adapter cable (the audio jacks).
- Plug the Hauppauge AV adapter into the AV input on the back of the HD PVR.(click here to see the complete cable setup)
- In Hauppauge Capture, in the Capture or StreamEez tab, set Audio in to Line in and mute the audio (so you will not hear an audio echo).
Here are some screen shots if you have an nVidea 650M graphics adapter in your gaming PC
 Screen resolution menu |
 Advanced Settings menu. Then click List All Modes |
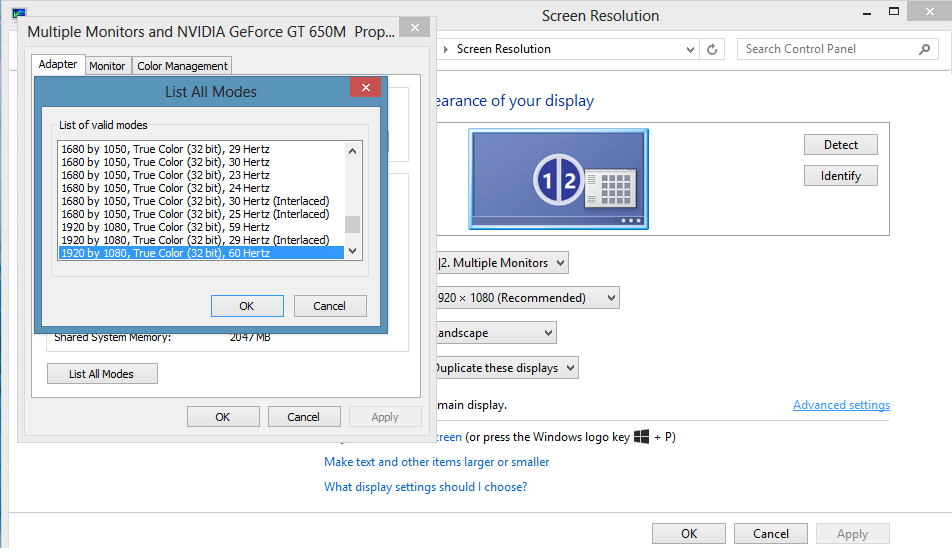 List All Modes menu. Set the screen resolution to 1920 by 1080, True Color (32-bit), 60Hz. Then click OK / OK and Apply. |
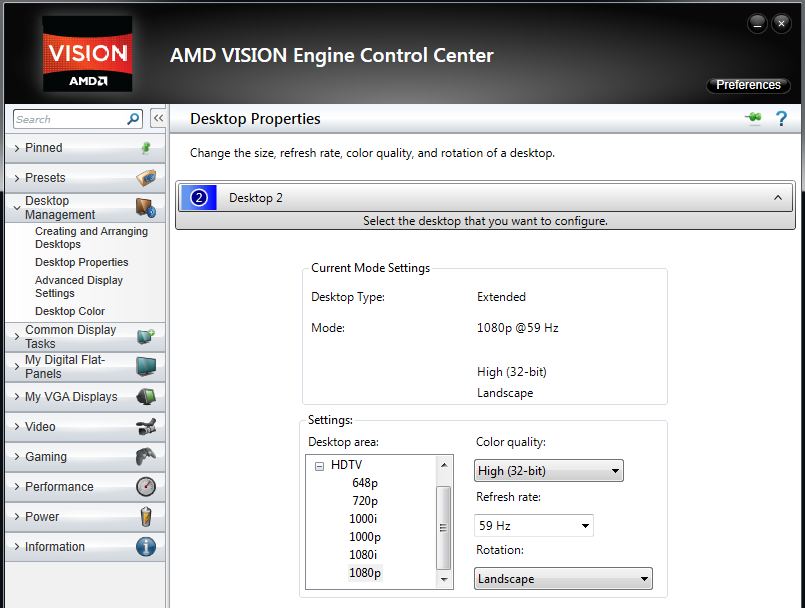
Here are some screen shots if you have an ATI graphics adapter in your gaming PC
In the AMD Vision Control Center, under Desktop Management/Desktop Properties, set the Desktop area to 1080p or 720p and the Refesh rate to 60Hz, 59Hz or 50Hz
How to turn off HDCP on your PS4
Are you unable to record video, getting no video (but you might get choppy audio) in your recordings or a black screen in Hauppauge Capture?
Does the Input resolution indicator in Hauppauge Capture switch between '1920x1080p 60fps' and 'Waiting for HDMI video signal'?
If so, you should turn off HDCP copy protection on your PS4
Hauppauge game recorders cannot record HDMI video which has HDCP copy protection. Video with HDCP copy protection can come from an Xbox One or a PS4, or a cable TV or satellite box. Note: if you have a cable TV or satellite box, you should use Component video and not HDMI. HDMI out on cable/sat boxes often has HDCP copy protection.
If you have a PS4, you need to disable HDCP. Here is how to do this:
- First, connect your PS4 directly to your gaming monitor (since you will not be able to see the PS4 on your computer screen if there is HDCP copy protection on the PS4)
- Next, go to Settings: from the main user interface, push up on the DualShock 4 to reach the top-level of the system’s menu, and select the toolbox labelled ‘Settings’.
- Enter the System submenu: When the long list of options appears, scroll down to the icon named ‘System’ and select it.
- Turn off HDCP encryption: You’ll find another long list in Settings. Scroll down to ‘Enable HDCP’ and ensure that the box to the right of the label is not checked. It will be enabled by default, so simply click on it to disable the HDCP copy protection.
- If you have any applications open, the system will ask you to close them, so make sure that you’ve saved your game before completing this last step.
- Now you can reconnect your PS4 back to the Hauppauge game recorder, and the HDMI out of the Hauppauge game recorder to your TV monitor. You should be able to see your game on your computer screen and TV monitor.
Streaming with YouTube Live and Streameez
Video setup guide to YouTube Live
Click to play video
Live streaming guide from YouTube
Click here for instructions from YouTube
YouTube Live Quick Setup Guide for StreamEez
Quick Setup Guide for StreamEez
YouTube Live with StreamEez Setup Video
Streaming with Facebook Live using Hauppauge Capture's StreamEez
Here are the steps to live stream with Facebook:
- 01 - Open Hauppauge Capture. Make sure you have live video from your video source (HDMI, component video or composite video)
- 02 - In Hauppauge Capture, go to the 'StreamEez' tab. Click ‘Start Device’ to get StreamEez running.
- 03 - Under ‘Service’, select ‘Facebook’. You will need two things from Facebook: the stream URL and a stream key.
- 04 - Log into your Facebook account and then go to: www.facebook.com/live/producer
- 05 - You will be in the Facebook Live producer page. Look in the middle of the page for the ‘Live Stream Setup’
- 06 - In ‘Live Stream Setup’, copy ‘Server URL’ to Hauppauge Capture ‘Server URL’
- 07 - Then copy ‘Stream Key’ to Hauppauge Capture ‘Stream key’
- 08 - In Hauppauge Capture click ‘Start Streaming’
- 09 - In Facebook Live, click ‘Go Live’.
You will now have a live stream from Hauppauge Capture posted to your Facebook page
Here is a setup video showing how to stream live video with Facebook and Hauppauge Capture

Troubleshooting your HD PVR Rocket
Note: We always recommend that you use both the black and red USB connectors on the 'Y' cable, plugged into two USB ports. Sometimes computers do not provide enough power on one USB port and therefore we recommend using BOTH the red and black USB connectors.
If you are using a USB power adapter (similar to the ones used as cell phone chargers), check to see if the power provided is at least 5v @ .75 amps
Flashing light on your HD PVR Rocket when trying to record standalone?
If the blue or red light on the HD PVR Rocket flashes when you press the button to record, or you lose pass through to your TV or monitor when you start to record, this indicates that the Rocket does not have enough power to operate fully. You will need to use both the Black and the Red USB connectors on the Rocket cable. This is due to one of your USB ports not having enough power for the Rocket.
Connecting both the Red and Black USB connectors on the supplied Rocket USB cable to two USB ports on your PC will fix this problem.
The Rocket shows a blinking blue light, not the green one which means the Rocket is ready to record
Blinking blue means the Rocket isn’t seeing video. There are some things you can do to fix this:
- First: check the video connections. If you are recording from HDMI, make sure that your video source does not have HDCP copy protection. If you are using Composite video, check to make sure the Yellow composite video connection is going to the Hauppauge A/V cable's Blue video connector. If you are recording from a PC, make sure the HDMI output is enabled (normally you have to hit the F4 key to turn on the HDMI port).
- Next, if you are using composite video (the yellow RCA connector), update your Rocket to firmware version .43 (firmware version .43 has the best composite video support).
- In all cases, flashing the firmware can sometimes correct video issues as well.
Flashing Blue light on your HD PVR Rocket when PC connected?
If the Blue light flashes and does not stop, you will need to use both the Black and the Red USB connectors on the Rocket cable. This is due to one of your USB ports not having enough power for the Rocket.
Connect both the Red and Black USB connectors on the supplied Rocket USB cable to two USB ports on your PC.
Using S-Video but you are getting a flashing blue light when recording standalone?
Flashing blue means there is a video problem: this could be either the S-Video cable or the firmware version is wrong (.43 is the best for S-Video).
To check this, connect the Rocket to a Windows PC and run Hauppauge Capture.
Once Hauppauge Capture is installed, click on the 'Advanced' button (left column on the bottom), then click 'Firmware' and confirm that you are using .43
Then, close the Advanced menu and look at the 'Video In' setting. Make sure the 'Video in' selection is 'S-Video'.
Once this is confirmed, simply close Hauppauge Capture and S-Video will always be used.
If you are still seeing a flashing blue light, it means that either the Hauppauge A/V cable is not firmly connected, or your S-Video source is not turned on.
No audio in your recordings?
John reported "I have a Zoom metting tomorrow that I need to record and I'm testing it today. I am able to record the video, but there's no audio recording. Is there something I am not doing correctly? I have HDMI out from laptop to the Rocket stand alone recording to a USB drive."
Make sure your PC audio output is going to the Rocket. To check this, right click the speaker icon in the device tray and select 'Playback Devices' or 'Open Sound Settings'. Under 'Choose your output device' or under 'Playback devices', make sure you have the 'HD PVR Rocket' selected.
When making a stand alone recording with an HDMI video source, are you getting black video but good audio?
If so, then your video source has HDCP copy protection. HDCP will give you a black video screen but good audio. You will need to use Component video, which never has HDCP copy protection.
Are you getting low audio volume in your Rocket recordings?
If you find that the audio is too low after recording in standalone mode, download and install the Hauppauge Capture application from this link: http://www.hauppauge.com/capture/.
After installation, open Hauppauge Capture. Make sure the Rocket is listed as the source (in the upper left hand corner of Hauppauge Capture, you should see HD PVR Rocket listed) and then increase the Game audio volume. Now close Hauppauge Capture to save the new audio volume setting and you're recordings will have increased audio volume.
Does your Rocket keep blinking red even though you have a USB thumb drive plugged in?
If the Rocket keeps blinking red even though you have a flash drive plugged in, your thumb drive might not be formatted as NTFS. Try reformatting the flash drive on a PC by inserting the Flash drive in a USB port and then when the drive is assigned a drive letter, right click on the drive and choose format (NTFS or FAT32).
The red light will also blink if your USB thumb drive is corrupt. Most times this can be easily fixed by plugging your thumb drive into a Windows PC and running Error Check. To do this: open File Manager and select your thumb drive. Right click on the thumb drive and select Properties -> Tools -> Error check and click Check. When the scan is complete, your USB thumb drive will be 'clean' and should work in the Rocket.
Are you unable to record video, getting no video (but are getting audio) in your recordings or a black screen in Hauppauge Capture? Does the Input resolution indicator in Hauppauge Capture switch between '1920x1080p 60fps' and 'Waiting for HDMI video signal'?
The HD PVR Rocket cannot record HDMI video which has HDCP copy protection. This can be from an Xbox One or a PS4, or a cable TV or satellite box.
If you have a cable TV or satellite box, you must use Component video and not HDMI. If you have a PS4 or an Xbox One, you need to disable HDCP. Here is how to do this:
- Xbox One: Press the Xbox button on the console for ten seconds until the console turns off. Touch the Xbox button on the console again to turn it on. Try to play the video game again.
- On the PS4: Go to Settings: from the main user interface, push up on the DualShock 4 to reach the top-level of the system’s menu, and select the toolbox labelled ‘Settings’. Enter the System submenu: When the long list of options appears, scroll down to the icon named ‘System’ and select it. Turn off HDCP encryption: You’ll find another long list in Settings. Scroll down to ‘Enable HDCP’ and ensure that the box to the right of the label is not ticked. It will be enabled by default, so simply click on it to disable the irritating feature. If you have any applications open, the system will ask you to close them, so make sure that you’ve saved your game before completing this last step.
Do your Rocket recordings have the wrong time and date?
In standalone mode, if the time stamps on the recordings on the flash drive are not correct, download and install the Hauppauge Capture application from this link: http://www.hauppauge.com/capture/. After installation, open Hauppauge Capture and make sure the Rocket is listed as the source. Now close Hauppauge Capture. The settings including the time and date will be saved to your Rocket, and stand alone recordings will now match the time and date on your PC.
HD PVR Rocket Frequently asked questions
What is the HD PVR Rocket?
The HD PVR Rocket is a high definition H.264 portable video recorder. The Rocket can record HD video either stand alone (to a USB thumb drive) or connected to a Windows PC. The Rocket can receive video from either HDMI or compenent video and will record up to 1080p30 onto an attached USB thumb drive. The Rocket is USB bus powered and can be powered by a USB port on your Xbox or Playstation game system. The Rocket has a built-in audio mixer which will take microphone audio and mix it with game audio so you can add game commentary to your game play recordings.
The Rocket can also be connected to a PC, which we call the 'PC connected mode'. In this mode, recordings are made to the hard disk inside your PC and the USB thumb drive is not used.
Do I need to connect the HD PVR Rocket to my PC to record?
No. The Rocket can be used either with or without a PC. When used standalone it records to a USB thumb drive which is plugged into the front of the Rocket and power is provided from the USB port on the back of the Rocket (5v at 1.0a minimum needed).
When connected to a PC, you can use Hauppauge Capture to record, upload and stream. Recordings are made to your PCs hard disk drive.
When PC connected, settings such as the video and audio source is 'sticky' and will be used when standalone.
What types of video sources can I record?
The Rocket can record from HDMI (without HDCP), Component video and composite video. Video input resolutions can range from standard definition 720x480 up to 1080p60.
Common examples are:
- video cameras with HDMI out
- game consoles such as the Xbox One, PS4, PS3, Xbox 360
- PC Graphics cards (from the HDMI port on the graphics card) so you can record your PC screen
- cable or satellite set top box can be recorded from Component video and composite video. HDMI is often blocked with HDCP copy protection on cable and satellite boxes, so you should use Component (red/green/blue connectors on the back of your cable/satellite box) for best results. Some people have reported they can record HDMI from a cable/satellite box, but many boxes block the HDMI port with HDCP copy protection.
- to record composite video (the yellow connector on the back of video cameras, VCR's and cable/satellite boxes) with the Rocket, you connect the yellow connector from the video source to the Blue connector on the Hauppauge AV cable, and then in Hauppauge Capture, set 'Video In' to 'Composite'.
When recording stand alone, how should I format my USB flash drive?
The Rocket will record to NTFS and FAT32 formatted USB flash (thumb) drives. But if you format as FAT32, due to the 4GB file size limit of FAT32, every 4GB (about 1 hour) of recording will result in a new recording.
With NTFS, there is no file size limit so one recording can be the size of the thumb drive.
Please note: most Sandisk USB flash drives are formatted at their factory as FAT32. So, to get one long recording on a Sandisk flash drive, you should reformat it with NTFS
Can I use a USB 3.0 or 3.1 thumb drive?
Yes. We have tested the Sandisk Ultra Flair USB 3.0 Flash Drive and the PNY Elite-X Fit USB 3.1 flash drive with the Rocket. Note: these thumb drives come from the factory formatted as FAT32. To get large continuous recordings (greater than 4GB), you will need to reformat the thumb drive as NTFS.
Will WinTV v10 work with the HD PVR Rocket
Can I plug in a hard disk drive in place of the USB thumb drive?
If you have a self powered hard drive ('self powered' means it has its own power supply) which is USB connected, you can plug the USB cable from the hard drive into the front of the Rocket in place of the USB thumb drive. The Rocket itself does not have enough power to drive a hard drive, so it must be self powered.
How can I change the recording bit rate in standalone mode?
Changing the Rocket bitrate (quality) and audio/video source settings is done through the Hauppauge Capture application. Connect your Rocket to a PC, install the Hauppauge Capture application. Then open Hauppauge Capture and adjust the bit rate (Quality) up or down using the bitrate slider. You can also change the audio/video source and the main audio volume.
Then close Hauppauge Capture.
Any adjustments you make in Hauppauge Capture (except for the microphone audio volume, which is adjusted standalone from the control panel on top of the Rocket) will be saved when you exit the application and be applied to standalone mode.
What do the lights on the Rocket mean?
In stand alone mode:
- Blinking Blue - The blue light blinks while the Rocket is powering up, and then will blink blue if there is no Video or video is out of range
- Blinking Red - no thumb drive or a badly formatted thumb drive
- Blinking Green - HDCP detected
- Solid Green - Ready to record
- Red Record Ring - Recording!
- Solid Green going to Blinking Blue: this means the Rocket cannot 'see' an analog video source. In this case, you need to change the Rocket firmware to .43 (see this page at the bottom for instructions on how to change to .43 firmware)
When Rocket is PC connected:
- Blinking Blue - Applying a new setting - wait until the light goes to green (see the note below if the Blue light does not stop blinking)
- Solid Green - Ready to Record
- Red Record Ring - Recording!
Note: if the Blue light comes on and does not go off, you might need to connect BOTH ends of the USB cable (the red and black ends) to two USB ports on your PC. A blinking Blue light which does not go away means there is not enough power from one USB port and you should plug the second, black USB connector, in.
I want to use my Rocket with OBS to stream retro game play. How do I setup OBS?
First, we assume that your retro gameplay is coming in from composite video (the yellow cable) and left/right stereo audio.
OBS by default uses HDMI audio/video, so you need to change the source in OBS to composite video and left/right stereo audio. If you have the Hauppauge Component AV Cable (Part number 6021333), connect the yellow jack from your video source to the Blue RCA jack on the Hauppauge AV cable.
Here are the steps to setup OBS:
- First, make sure you have removed any HDMI cable connected to the HDMI In port on the back of the Rocket.
- Now, open Hauppauge Capture. In Hauppauge Capture under Video In, select Composite and under Audio In select AV In. Make sure you can see your retro game video in the Hauppauge Capture preview window. If not, check your cables. You must see video in Hauppauge Capture before you can move onto OBS
- Once you can see your video in the preview window, close Hauppauge Capture and open OBS
- The first thing to do in OBS is add a new Video Capture Device. In Sources, click the + and select Video Capture Device
- If you are using the Rocket, select IT9910 Capture and click OK
- Next, click Configure Crossbar. A few seconds later you should see the video source setup for the Rocket. Choose the source you are connected to, such as Composite In. You will have five choices: 0 Video Parallel Digital In which is HDMI, 1 Video YRYBY In which is Component video, 2 Video SVideo In which is S-Video, 3 Video Composite In for composite video and 4 Video RGB In
- Then finish the setup: click Apply, OK and then Deactivate, Reactivate and then OK
In about 15 seconds you should now see your composite video source in the OBS Preview window.
I made a stand alone recording and I found the recording was broken into two files. What did I do wrong?
You probably used a FAT32 formatted USB thumb drive. If you format your thum drives as NTFS, you can make one recording as large as your thumb drive.
How do I turn off HDCP on a PS4?
- On the PS4, go to Settings: from the main user interface, push up on the DualShock 4 to reach the top-level of the system’s menu, and select the toolbox labelled ‘Settings’
- Enter the System submenu: When the long list of options appears, scroll down to the icon named ‘System’ and select it
- Turn off HDCP encryption: You’ll find another long list in Settings. Scroll down to ‘Enable HDCP’ and ensure that the box to the right of the label is not ticked. It will be enabled by default, so simply click on it to disable the irritating feature. If you have any applications open, the system will ask you to close them, so make sure that you’ve saved your game before completing this last step.
How do I turn off HDCP on an Xbox One?
The following information comes from the Xbox support site
Problem: Playing premium content on your console establishes an HDCP connection with your television. Some unintended video and sound behavior may occur if you plug in a DVR or home entertainment system while the console is turned on.
To resolve this problem, try the following solutions:
- Restart your Xbox One console:
- Press the Xbox button on the console for ten seconds until the console turns off.
- Touch the Xbox button on the console again to turn it on.
- Try to play the content again.
- If your Xbox One console is in instant-on power mode:
- Go to the Home screen.
- Press the Menu button on your controller and select Settings.
- Go to Power & startup, then Power options.
- Select Power mode and then select Save Energy.
- Turn off the console by holding the Xbox button.
- Turn on the console by pressing the Xbox button, and then try to play the content again.
What kind of webcam can I use to make Facecam videos
Hauppauge Capture uses any webcam, either HD or standard definition, as long as it has a 'raw' YUV or YUY2 mode. MJPEG and other compressed formats are not used. Your webcam can be 4:3 or 16:9. Popular webcams include the Microsoft Lifecam HD-3000 plus, if you have a laptop, the built-in webcam.
Hauppauge Capture chooses the most suitable video mode supported by your webcam. You can set the size of the video, and the format (4:3 or 16:9) in the Settings menu of Hauppauge Capture.
What is the range of video resolution I can capture?
The Rocket records in standard video resolutions: 480i, 480p, 720p, 1080i, 1080p as well as several PC specific resolutions. When connected to a 1080p60 video source (HDMI from a game console or PC or Component video), the Rocket will record at 1080p30.
Using Component Video, what is the highest Resolution/Frame Rate which can be captured with the Rocket?
Using Component video, the Rocket can record up to 1080p at 30 frames per second.
Does the Rocket have No-Delay Passthrough?
Yes, the Rocket has a no delay pass-thru via HDMI Out so you can see your game on your TV set and at the same time, record your game play.
What is the red button on the top of the Rocket used for?
The red button is used to start and stop recordings while in standalone mode, and to start and stop streaming in StreamEez.
Where are my recordings saved?
While in standalone mode, recordings are saved on a USB flash drive which is plugged into the front of the Rocket in an MP4 file format.
When in the PC connected mode, recordings are saved to your PC's hard drive. The default folder is c:\users\public\videos.
How long can my recordings be?
In standalone mode, recording length is only limited by the size of your NTFS formatted USB thumb drive. For example, a 32Gb NTFS USB thumb drive can hold up to 8 hours of video.
*PLEASE NOTE*: When recording to a USB thumb drive, unless the USB thumb drive is formatted as NTFS, your recordings are formatted in 2Gb file "chunks".
Can I include my headset's Microphone Audio in my Recordings?
Yes. When the Rocket is used stand alone, you can plug your microphone or your headset's microphone into the 'Mic input' jack on the front of the Rocket. Then you can use the mixer panel on the top of Rocket to adjust your audio volume. In the stand alone mode, the recordings made onto the USB thumb drive have mixed game and microphone audio.
What is the highest Bit-Rate the Rocket can Record?
18Mbit/s
What Software should I use with the Rocket?
When used stand alone, the Rocket does not need any software to operate.
But the Rocket can also be connected to a PC so that you can record to the PC's disk drive. This is called 'PC connected mode of operation'. When PC connected, the Rocket works with our Hauppauge Capture software for recording and most third party editors for editing.
Why does the supplied USB Cable have two Connectors on one end?
The red end of the USB cable is for power only: this is used when recording in standalone mode. The black end of the USB cable is used when operating in PC mode.
You can plug both the black and red ends into two USB ports, which will provide more power to the Rocket and is useful with certain low power USB ports.
Can I record stand alone to an SSD drive?
Yes ... but.
You can plug an SSD drive into the Rocket's USB port, but the SSD drive needs to be 'self powered'. The Rocket on its own does not have enough power for the SSD.
What is the panel on the top of the Rocket used for?
This panel controls microphone settings. You can adjust the microphone audio volume, mute the microphone or add a +20db audio boost (used with unpowered microphones).
Can I record my TV shows with the Rocket?
Yes. If you have a cable TV or satellite TV set top box with component video outputs, you can connect it to the Rocket using the supplied Hauppauge A/V Cable set. When using component video, you must use Hauppauge Capture and select 'Component Video' for video, and 'AV In' for audio.
You can also try to record TV shows from HDMI, but some shows have HDCP copy protection and cannot be recorded.
Does the Rocket come with a power supply?
No, the Rocket is powered over USB. You can use a USB port on either your PC or game console. If you are trying to record a source without a USB port, you can use a standard USB power adapter as long as it is rated at 5v 1amp (minimum).
How To Record Xbox 360 Game & Party Chat
- Go to the Xbox Guide Menu.
- Go along to settings.
- Select Voice.
- Go down to voice output and select 'Play though both'. This will make the audio play out your TV and through your mic at the same time.
Depending on what game you are on, I highly recommend you turn down game volume as well as sometimes voice chat can't be heard because the game volume is too loud. However I guarantee that there will be a way to turn down your audio setting on whatever game you are on. Make sure you make it loud enough to hear, but quiet enough to make the voice chat clear and easy to hear.
Can I use the Rocket to Stream?
Yes. The latest version of Hauppauge Capture includes StreamEez, for streaming with the Rocket to Twitch and YouTube.
I am using the microphone for audio input, but I am not getting any audio in my recordings?
To record audio from the Microphone input jack, there also must be some audio coming from either the HDMI or Component Video connectors on the back of the Rocket.
If your HDMI source does not have audio but you would like to record audio from the Microphone as your only source of audio, here is a work around: in Hauppauge Capture, select the audio source as 'AV In'. Even though you don't have an audio source connected to the Hauppauge AV connector on the back of the Rocket, this will allow audio to come from the Microphone jack.
Our tech support department made a video showing how to do this: https://www.youtube.com/watch?v=yo74kk4kuRI


